Customizing a zipper pull is a simple yet powerful way to add a personal touch, improve functionality, or brand your gear, apparel, and accessories. This comprehensive guide will walk you through the entire process, from basic DIY methods to more advanced professional techniques.
Table of Contents
ToggleIntroduction: Why Customize Your Zipper Pull?
A zipper pull is more than just a functional component; it’s an opportunity for expression. Whether you want to custom a zipper pull to make your backpack easier to grip, add a pop of color to a jacket, or create branded pulls for a corporate promotion, the possibilities are endless. Learning how to custom a zipper pull allows you to infuse personality and utility into everyday items. This guide, built on proven methods and expert craft knowledge, will equip you with the skills to transform any ordinary zipper.
Understanding Zipper Pull Anatomy
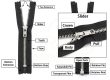
Before you begin, it’s helpful to understand the basic parts of a zipper slider.
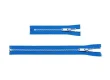
Slider: The part that moves up and down the zipper chain.
Pull Tab: The part you hold, which is the focus of customization. It is typically attached through the pull tab hole on the slider.
D-Ring/Slot: The opening on the slider where the pull tab is attached.
Method 1: The Simple Replacement (DIY)
This is the easiest way to custom a zipper pull and requires minimal tools.
Materials You’ll Need:
Existing zipper pull you want to replace
Scissors or a small screwdriver
Your chosen new pull (e.g., paracord, leather strap, pre-made charms, keyrings)
Step-by-Step Instructions:
Remove the Old Pull: Carefully examine how the current pull is attached. Most are held on by a small, split metal ring. Use a small flat-head screwdriver or your scissors to gently pry this ring open. Slide the old pull off.
Attach the New Pull: Take your new custom pull—for example, a loop of paracord or a leather strap—and thread it through the hole on the slider.
Secure the Attachment: If using paracord, you can tie a secure knot like a double overhand knot or a snake knot. For a leather strap, you might use a rivet or a knot. Ensure the connection is tight and secure.
Test the Function: Zip and unzip the item a few times to ensure your new pull moves smoothly and doesn’t come loose.
Method 2: Creating a Custom Paracord Zipper Pull
Paracord is a popular choice due to its durability, wide range of colors, and the variety of knots you can use.
Materials You’ll Need:
Paracord (about 12-18 inches)
Lighter or matches
Scissors
Step-by-Step Instructions:
Cut the Cord: Cut a length of paracord, typically 12-18 inches depending on the desired final length and knot complexity.
Melt the Ends: Briefly melt the cut ends of the paracord with a lighter to prevent fraying.
Choose and Tie a Knot:
Simple Loop: Fold the cord in half, thread the loop through the slider’s hole, then pull the two loose ends through the loop and tighten.
Snake Knot: This creates a stylish, braided look. There are many excellent video tutorials from authoritative craft channels like Weavers of Eternity or Tying It All Together that can visually guide you through this process.
Diamond Knot: A more complex and decorative knot that provides a comfortable, bulky grip.
Finish and Secure: Once your knot is complete and the pull is the desired length, trim the excess cord and melt the ends to seal the knot permanently.
Method 3: Professional and Branded Custom Pulls
For businesses or a more polished look, creating custom-molded or printed zipper pulls is the best option.
Techniques for Professional Customization:
Injection Molding: Ideal for high-volume production. This process involves creating a custom mold and injecting plastic or rubber to form pulls with your exact logo, shape, and color. Sourcing from reputable manufacturers is key to quality.
Laser Engraving: This method can be used on metal or leather pulls to etch detailed logos, text, or patterns with high precision.
Sublimation Printing: Allows for full-color, complex designs to be printed onto a coated metal surface, resulting in a vibrant and durable image.
Sourcing Professional Custom Pulls:
To ensure quality and trustworthiness, work with established suppliers in the garment hardware or promotional products industry. Look for companies with certifications and positive reviews.
Creative Ideas and Inspiration for Your Custom Zipper Pull
Personalized Jewelry: Use small charms, beads, or even a family ring.
Functional Upgrades: Attach a small carabiner or a whistle for multi-purpose use.
Color Coding: Use different colored paracord or pulls to easily identify specific bags or compartments.
Themed Pulls: Create pulls that match your hobbies—for example, a gear-shaped pull for a mechanic’s tool bag.
Conclusion: Unleash Your Creativity
Learning how to custom a zipper pull is an accessible and rewarding skill. From a quick five-minute paracord replacement to sourcing professionally branded pulls, you now have the knowledge to enhance both the form and function of your zippers. The process empowers you to repair, personalize, and elevate your belongings in a unique way.
Ready to get started? Gather some basic supplies and transform the zipper on an old jacket or bag today. Share your creations in the comments below

- How To Reattach A Zipper? - February 20, 2026
- How to Put a Zipper Back On? A Step-by-Step Repair Guide - February 19, 2026
- How To Fix A Broken Zipper? Simple Repair Methods for Every Type of Damage - February 19, 2026