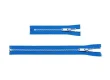
Replacing a metal zipper slider is a straightforward repair that can breathe new life into your favorite garments and gear. This guide will walk you through the process, ensuring you can restore your zippers to their former glory.
Table of Contents
ToggleUnderstanding the Need for a Metal Zipper Slider Replacement
When your metal zipper slider becomes damaged or worn, it can lead to frustrating problems like the zipper getting stuck, separating, or failing to close completely. Replacing the slider is often a cost-effective solution compared to replacing the entire zipper or the item itself.
Common Signs of a Bad Zipper Slider
- Zipper is stuck: The slider won’t move up or down the teeth.
- Zipper separates: The teeth come apart after zipping.
- Slider is loose: The slider feels wobbly or doesn’t grip the teeth firmly.
- Difficulty zipping: You have to struggle to get the zipper to close.
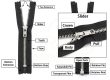
Essential Tools and Materials
Before you begin, gather these items:
- Replacement metal zipper slider: Make sure it’s the correct size and type for your zipper. The size is often indicated on the back of the old slider or by measuring the width of the zipped teeth in millimeters.
- Needle-nose pliers or end nippers: For removing and crimping the zipper stop.
- New zipper stop (optional): You may need a new stop if the old one is damaged.
- Small pin (optional): For aligning zipper teeth.
- Scissors
Step-by-Step Instructions for Replacing a Metal Zipper Slider
Here’s how to replace your metal zipper slider:
1. Identify Your Zipper Type and Slider Size
- Zipper Type: Confirm that you have a metal-tooth zipper. Sliders for plastic or coil zippers will not work.
- Slider Size: The size is usually marked on the back of the slider (e.g., “5” or “10”). Alternatively, measure the width of the zipped teeth in millimeters.
2. Remove the Metal Zipper Stop
- Use needle-nose pliers or end nippers to gently squeeze and remove the metal stop from the top of the zipper, on the side where the slider is.
- Be careful not to damage the fabric or zipper teeth.
3. Remove the Old Slider
- Slide the worn or damaged slider up and off the zipper teeth.
- Note the orientation of the slider for reinstallation.
4. Install the New Metal Slider
- Place the new slider onto the zipper teeth, ensuring it matches the orientation and side of the old slider.
- Gently work it down onto the teeth. If alignment is difficult, use a small pin to guide the teeth into the grooves.
5. Replace and Secure the Metal Stop
- Position a new stop at the top of the zipper.
- Crimp the stop with pliers to firmly hold the teeth in place. Avoid pinching too hard, which can break the stop.
6. Test the Zipper
- Move the slider up and down several times to ensure it runs smoothly and the teeth lock properly.
Additional Considerations and Troubleshooting
- Closed-Loop Zippers: For closed-loop zippers (where you can’t access the top), you may need to undo the bottom stop or stitching to remove and replace the slider. Afterwards, re-sew or crimp a new bottom stop.
- Finding the Right Slider: If you can’t find the exact slider, look for the zipper model number (usually on the back of the old slider) when ordering replacements.
- External Resource: REI offers further advice on zipper repair.
- Slider Doesn’t Stay Closed: If the slider doesn’t hold the zipper closed, it might be worn. Replacing the slider is the best solution.
Conclusion
Replacing a metal zipper slider is a practical skill that can save you time and money. By following these steps, you can easily repair your zippers and extend the life of your favorite items.

- How To Reattach A Zipper? - February 20, 2026
- How to Put a Zipper Back On? A Step-by-Step Repair Guide - February 19, 2026
- How To Fix A Broken Zipper? Simple Repair Methods for Every Type of Damage - February 19, 2026