Removing a metal zipper slider involves a few key steps: you’ll need to remove the top stopper, slide the slider off, and then you’re done! It’s a straightforward process, but it requires the right tools and a little bit of patience. This guide, based on years of experience with metal zippers, will walk you through the process, ensuring you can confidently tackle this common repair.
Before you start, gather the following tools. Having the right equipment will make the job much easier and safer.
End Nippers or Cutting Pliers: These are essential for removing the metal stopper.
Needle-Nose Pliers: Helpful for handling and replacing the stop.
Gloves: To protect your hands from sharp edges.
(Optional) Snips or a Hacksaw Blade: These can be helpful if the stopper is difficult to remove.
Step-by-Step Guide to Removing a Metal Zipper Slider
Here’s a detailed breakdown of how to remove a metal zipper slider:
Step 1: Locate and Remove the Top Stopper
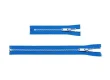
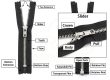
The first step is to remove the metal stopper. This small piece of metal is usually located at the top of the zipper track, preventing the slider from coming off.
Use your end nippers or cutting pliers to gently pinch and remove the stopper. Be careful not to damage the zipper tape or teeth.
If the stopper is tight or damaged, you may need to use snips or a hacksaw blade to cut through it.
Step 2: Slide the Zipper Slider Off
Once the stopper is removed, you can now slide the metal zipper slider off the zipper teeth.
Carefully slide the slider off the end of the zipper teeth.
Pay attention to the slider’s orientation (which side is up) for when you replace it.
Step 3: Dealing with Separating Bottom Ends
If the zipper has a separating bottom end (like on a jacket), you may need to adjust your approach.
Move the slider to the very bottom of the zipper.
Separate the two sides of the zipper. This might make removing the slider easier.
Safety Tips
Safety should always be a priority when working with tools and small metal parts.
Wear Gloves: Protect your hands from sharp edges, especially when handling tools or metal parts.
Avoid Damaging the Zipper: Be careful not to tear the fabric or damage the zipper teeth during removal.
What to Do After Removing the Slider
After removing the slider, you might be replacing it, or perhaps you’re repairing the zipper itself.
Replacing the Slider: Work the new metal slider onto the zipper in the same orientation as the original. Re-attach a new metal stop using needle-nose pliers.
Zipper Repair: Inspect the zipper teeth for damage. You may need to replace the entire zipper or repair individual teeth.
When to Seek Professional Help
While removing a metal zipper slider is often a DIY project, there are situations where professional help is best.
Complex Zipper Designs: If the zipper has an unusual construction or is part of a high-value item, consult a professional.
Extensive Damage: If the zipper teeth are severely damaged or the fabric is torn, a professional repair might be necessary.
Conclusion
Removing a metal zipper slider is a practical skill that can save you time and money. By following these steps and using the right tools, you can successfully remove the slider and tackle a variety of zipper repair projects. Remember to prioritize safety and take your time.
I'm Jody, the force behind Rochezipper's content. My 20 years in zipper production ensure our resources are expert-vetted and insightful. Discover how our expertise can elevate your products. I am dedicated to guiding you to the right solution. Browse our offerings and let's build something great together.
I'm Jody, the force behind Rochezipper's content. My 20 years in zipper production ensure our resources are expert-vetted and insightful. Discover how our expertise can elevate your products. I am dedicated to guiding you to the right solution. Browse our offerings and let's build something great together.