Table of Contents
ToggleHow To Reattach A Zipper: Step-By-Step Guide For Jackets And Bags
A broken zipper can make a jacket, bag, or pair of jeans useless. You do not need to throw it away or pay for a repair. You can fix it yourself with a few simple tools and a little time.
To reattach a zipper, line up the zipper tape with the fabric edge, secure it with pins or clips, and sew it back in place using steady, tight stitches. When you know how the parts fit together, you can fix most zipper problems at home and make the item work like it should again.
Key Takeaways
- Check the zipper parts and fabric before you start the repair.
- Use basic tools and secure the zipper carefully as you sew.
- Test the zipper and care for it to prevent future problems.
Understanding Zipper Components and Common Issues
You need to know how a zipper works before you can fix it. Each part has a clear role, and most problems happen when one of these parts fails or slips out of place.
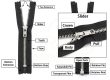
Parts of a Zipper
A zipper has several small parts that work together. When one part breaks or shifts, the zipper will not close or stay in place.
Main parts include:
- Zipper tape: The fabric strips on each side. You sew these into the garment.
- Teeth (or coils): The small plastic or metal pieces that lock together.
- Zipper slider: The metal or plastic piece that moves up and down to join or separate the teeth.
- Zipper pull: The tab attached to the slider that you hold and move.
- Top and bottom stops: Small clamps that keep the slider from sliding off.
The slider does the main work. As you pull it, it lines up the teeth so they mesh. If the slider bends or loosens, the teeth will not connect.
The zipper tape also matters. If it tears or stretches, the zipper can shift out of alignment and come off track.
Typical Reasons Zippers Come Off
A zipper usually comes off because the slider slips past the stops or the teeth separate under stress. This often happens with heavy use.
One common cause is a worn or loose zipper slider. When the slider spreads slightly, it cannot press the teeth together. The zipper may look closed but split open right away.
Another cause is missing or broken top or bottom stops. Without these small metal pieces, the slider can slide off the zipper tape completely.
You may also deal with:
- Torn zipper tape
- Bent teeth
- A broken zipper pull that makes it hard to guide the slider
On a separating zipper, like on jackets, the bottom pin and box can wear out. If they do not connect firmly, the zipper will not stay attached.
Types of Zippers
You need to know the type of zipper before you reattach it. Different types connect in different ways.
Common types of zippers include:
- Separating zipper: Found on jackets and coats. The two sides fully come apart at the bottom.
- Non-separating zipper: Used on pants and bags. The bottom stays closed.
- Invisible zipper: Often used in dresses and skirts. The teeth hide behind the zipper tape.
- Metal, plastic, or coil zippers: Named for the material of the teeth.
A separating zipper has a bottom box and pin system. You must align these parts exactly to reattach it.
A coil zipper uses nylon coils instead of separate teeth. These are flexible but can stretch. Metal zippers are strong but may bend if forced.
You should always match the repair method to the zipper type to avoid causing more damage.
Initial Assessment and Diagnosis
Start by looking closely at the zipper before you try to fix a zipper. You need to know what failed and why, so you do not waste time on the wrong repair.
Identifying Zipper Problems
First, check what actually happened. Did the zipper come off one side, or did the slider slide off the track? A separated zipper often means the slider no longer lines up the teeth.
Look for these common problems:
- Slider came off the top or bottom
- Teeth will not close when you pull the slider
- Zipper splits open after you zip it
- Bottom stop broke, so the zipper came apart
- Teeth are missing or bent
If the zipper splits behind the slider, the slider may be worn out. If the zipper came off one side only, you may just need to rethread it.
Check both sides before you start fixing a zipper. Small issues, like a loose top stop, need a different repair than a broken zipper with missing teeth.
Assessing Zipper Teeth and Tape Condition
Now inspect the zipper teeth and the fabric tape on both sides. Run your fingers along the teeth to feel for bends or gaps. Missing teeth often mean you cannot fully fix a zipper without replacing part of it.
Look closely at:
- Bent or crushed teeth
- Gaps where teeth are missing
- Frayed or torn zipper tape
- Loose stitching along the tape
If the teeth look straight but do not connect, the slider may be too loose. If the tape is torn, reattaching the zipper may not hold unless you repair the fabric first.
A strong repair depends on solid tape and working teeth. When you assess these parts carefully, you choose the right zipper fixes and avoid repeat problems.
Tools and Materials Needed for Zipper Repair
You need a few basic tools and the correct replacement parts to reattach a zipper the right way. Using the proper size and type of parts helps the zipper slide smoothly and stay secure.
Essential Zipper Repair Tools
Start with a small set of basic hand tools. Most zipper repairs do not require special equipment, but you must use the right size tools for small parts.
Key tools include:
- Needle-nose pliers – grip and crimp zipper stops or pulls
- Small scissors – trim loose threads or fabric
- Seam ripper – remove stitches without tearing fabric
- Sewing needle and strong thread – resew zipper tape if needed
- Tweezers – handle small metal parts
A zipper repair kit can save time. Many kits include zipper pulls, top stops, bottom stops, and a few sliders in common sizes. Keep the kit organized so you can quickly match parts.
Work on a flat surface with good light. Small pieces like a zipper stop are easy to lose.
Choosing the Right Replacement Parts
You must match the replacement parts to your zipper’s type, size, and material. Check the back of the slider for a number, such as 3, 5, or 8. This number shows the zipper size.
Common replacement parts include:
- Zipper pulls – replace broken or missing tabs
- Zipper sliders – fix separation or sticking
- Top stops and bottom stops – keep the slider from coming off
Use plastic parts for lightweight jackets and bags. Choose metal parts for jeans or heavy coats. The new part must fit the zipper teeth exactly. If it feels loose or tight, try another size.
If you are unsure, compare the old part side by side with the new one before attaching it.
How to Reattach a Zipper: Step-by-Step Methods
You can fix most zipper problems at home with basic tools and careful steps. The right method depends on whether the slider came off, the teeth split, or the zipper will not close.
Using Pliers to Reattach a Zipper
Use pliers when the slider slips off one or both sides of the zipper teeth. This method works well for jackets, jeans, and bags.
First, check the slider. If it looks bent or loose, replace it with one that matches the zipper size. You can find size numbers on the back of the slider, such as #3, #5, or #8.
Line up both sides of the zipper teeth so they sit straight. Slide the zipper pull onto one side, then guide the other side into the slider. Push gently until both sides feed in evenly.
Use pliers to squeeze the slider’s sides very lightly. Do not press too hard, or you may damage the teeth. Test the zipper by pulling it up and down several times.
If it moves smoothly and stays closed, you have completed the zipper repair. This is one of the most common zipper fixes and works for many types of clothing.
The Fork Method
The fork method helps when you need a simple way of putting a zipper back on without holding small parts in your hands.
Slide the zipper pull onto the middle prong of a regular dining fork. The fork holds the slider steady while you work.
Place both sides of the zipper tape into the slider at the same time. Make sure the teeth line up evenly. Push the fabric down while keeping the slider still on the fork.
Once both sides are inside the slider, pull the zipper up slightly to lock the teeth together. Then remove the fork and test the zipper.
This method gives you better control, especially with small zippers on pants or skirts. It reduces slipping and helps keep both sides even during zipper repair.
Alternative Repair Techniques
Some zipper fixes require more than putting a zipper back on. If the bottom stop is missing, the slider may fall off again.
In this case, sew a few tight stitches across the bottom of the zipper to act as a new stop. Use strong thread and small stitches. This keeps the slider from sliding off.
If the teeth separate after closing, the slider may be loose. Use pliers to gently tighten it. Squeeze a little at a time and test often.
For broken or missing teeth, replace the entire zipper. Remove the old zipper with a seam ripper, pin the new one in place, and sew it securely. This takes more effort, but it fully restores the zipper and prevents future problems.
Securing and Testing the Repair
Finish the zipper repair by locking the slider in place and making sure it moves without trouble. A secure zipper stop and a careful test help you fix a zipper that lasts.
Reinstalling Zipper Stops
You must replace the zipper stop to keep the slider from sliding off again. If you removed a metal stop, press a new one onto the zipper tape at the top or bottom where the old stop sat.
Use needle‑nose pliers to clamp it tight. Squeeze firmly, but do not crush the teeth or fabric.
If you do not have a metal stop, you can sew a strong thread bar across the tape. Wrap the thread several times around both sides of the zipper teeth, then tie a tight knot on the back side. Trim loose ends.
Make sure the stop sits straight and blocks the slider from moving past it. The slider should hit the stop and stop fully. If it slips past, remove the stop and install a new one.
Testing for Smooth Operation
After you secure the zipper stop, test the zipper repair right away. Zip the slider up and down at least 5 to 10 times.
Move it slowly at first. Watch the teeth as they close.
Check for these issues:
- Teeth that do not line up
- Gaps after closing
- Fabric caught in the slider
- A loose or shifting zipper stop
If the slider sticks, apply light pressure and guide the teeth together with your fingers. Do not force it. Forcing can bend the slider or damage the tape.
When the zipper moves smoothly from end to end and stops firmly at both ends, you have fixed the zipper correctly.
Maintenance and Preventive Care
Regular zipper maintenance keeps the teeth aligned and the slider moving with less force. Clean the zipper, add the right lubricant, and handle it with care to prevent future separation.
Applying Zipper Lubricants
Lubrication reduces friction between the zipper teeth and the slider. It helps stop sticking, grinding, and uneven movement.
Start by cleaning the zipper. Use a soft brush and warm water with mild soap to remove dirt and lint. Let it dry fully before adding any product.
Use a zipper wax stick, graphite pencil, or a silicone-based zipper lubricant. Rub the wax or pencil tip directly along the teeth on both sides. If you use liquid lubricant, apply a small amount with a cotton swab.
Move the slider up and down several times to spread the product. Wipe away any excess with a clean cloth.
Do not use oil, grease, or petroleum jelly. These attract dirt and can stain fabric.
For heavy-use items like jackets, tents, or bags, apply zipper wax every few months. For light-use clothing, once or twice a year is often enough.
Tips for Long-Term Zipper Health
Good daily habits protect your zipper from damage. Small actions prevent the need for repairs later.
Always align both sides of the zipper before pulling the slider. If it resists, stop and check for trapped fabric. Forcing it can bend teeth or widen the slider.
Wash garments with zippers closed. This reduces stress on the teeth and slider during the wash cycle.
Store items fully zipped when possible. This keeps the teeth straight and reduces strain at the bottom stop.
Follow these basic zipper maintenance steps:
- Clean dirt and lint from teeth regularly
- Apply zipper wax as needed
- Avoid pulling at an angle
- Repair loose stops early
Check the zipper every few months for loose teeth or a weak slider. Early fixes take less time and prevent full separation.
When to Replace a Zipper
Some zipper problems cannot be fixed by reattaching or adjusting parts. You need to know when repair will not last and when replacing a zipper makes more sense.
Irreparable Damage Indicators
Replace the zipper if the teeth are missing, bent, or warped along a large section. You cannot restore teeth that have broken off. If several teeth do not line up, the zipper will not close, even with a new slider.
Check the zipper tape as well. If the fabric tape is torn, frayed, or pulling away from the garment, reattaching it will not hold for long. Torn tape often rips again under stress.
Look at the slider. If you have already tightened or replaced the slider and the zipper still splits open, the teeth are likely worn down. Worn teeth cannot grip each other.
Also replace the zipper if the bottom stop has broken off and the teeth separate from the base. In these cases, replacing a zipper saves time and prevents repeated repairs.
Choosing a New Zipper
Choose a zipper that matches the length, type, and strength of the original. Measure the old zipper from top stop to bottom stop, not the full tape. Use the same length to avoid altering the garment.
Pick the right type:
- Coil zippers for dresses and light jackets
- Plastic molded zippers for coats and bags
- Metal zippers for jeans and heavy wear
Match the zipper weight to the fabric. Heavy denim needs a strong zipper. Light fabric needs a flexible one.
Check the color and tooth size. A close match keeps the repair neat and functional. When replacing a zipper, choose quality materials so the new zipper lasts longer than the old one.
Frequently Asked Questions
You can fix many zipper problems with basic tools and careful steps. Most repairs involve realigning teeth, replacing the slider, or securing the zipper back onto the fabric tape.
What is the best method to fix a zipper that has come off one side?
First, check if the slider is still attached to one side of the zipper. If it is, gently feed the loose side of the zipper tape back into the slider.
Use pliers to remove the bottom stop if needed. Slide the zipper down to realign both sides, then replace the stop or sew a few tight stitches at the base to hold it in place.
Make sure both sides sit evenly before you pull the slider up.
Can you reattach a zipper slider if it has completely detached?
Yes, you can reattach it if the teeth are not damaged. Remove the top stops with pliers so you can slide the zipper pull back onto the teeth.
Insert one side of the teeth into the slider first, then align the other side. Push both sides in evenly and slide the pull down a few inches.
Replace the top stops with new ones or sew tight stitches to keep the slider from coming off again.
What tools are needed to repair a separated zipper?
You need basic tools. Keep a pair of needle-nose pliers, a sewing needle, strong thread, and small scissors nearby.
For some repairs, use replacement zipper stops or a new slider that matches the zipper size. A seam ripper also helps if you must remove stitches around the zipper.
Choose tools that fit the size and type of your zipper.
Is it possible to fix a zipper without replacing the entire thing?
Yes, you can often repair the slider or stops without removing the whole zipper. If the teeth are intact, replace only the damaged part.
Tighten a loose slider with pliers by gently squeezing its sides. This small fix can help the teeth lock together again.
Replace the full zipper only if the teeth are bent, missing, or badly worn.
How do you realign the teeth of a zipper that won’t close properly?
Start by moving the slider to the bottom of the zipper. Check for dirt, thread, or fabric caught between the teeth and remove it.
If the teeth look uneven, gently straighten them with pliers. Pull the slider up slowly while keeping both sides straight and flat.
Stop if the teeth separate again and adjust the slider before trying once more.
What steps should be taken to prevent further damage when fixing a zipper?
Work slowly and avoid pulling hard on the fabric. Too much force can bend the teeth or break the slider.
Support the zipper tape with your fingers while you move the slider. Replace missing stops right away so the slider does not slip off again.
Test the zipper several times after the repair to make sure it moves smoothly without strain.

- How To Reattach A Zipper? - February 20, 2026
- How to Put a Zipper Back On? A Step-by-Step Repair Guide - February 19, 2026
- How To Fix A Broken Zipper? Simple Repair Methods for Every Type of Damage - February 19, 2026