Table of Contents
ToggleHow to Put a Zipper Back On: A Step-by-Step Repair Guide
A broken zipper can ruin your day, especially when it happens to your favorite jacket or bag. The good news is that most zipper problems are fixable at home without special skills or expensive tools.
You can put a zipper back on by repositioning the slider at the bottom of the zipper track and carefully guiding both sides of the teeth through the slider mechanism. The process takes just a few minutes once you understand how your zipper works. Some situations require different approaches depending on what went wrong.
This guide will walk you through the repair process for different types of zippers and common problems. You will learn what tools you need, how to diagnose the issue, and how to prevent future zipper failures.
Key Takeaways
- Most zipper repairs can be completed at home with basic tools like pliers and scissors
- Different zipper types require specific repair techniques based on their construction and material
- Regular maintenance and proper use will extend the life of your zippers and prevent common problems
Understanding Zipper Parts and Types
A zipper has three main parts that work together, and knowing which type you have helps you fix it correctly.
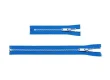
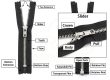
Essential Components of a Zipper
Every zipper contains three basic parts. The zipper teeth are the interlocking pieces that connect when you zip. They can be made from metal, plastic, or nylon coils.
The zipper slider is the piece you pull up and down. It has a wedge-shaped channel inside that pushes the teeth together or pulls them apart. Most sliders have a tab or pull attached to them.
The zipper tape is the fabric strip that holds the teeth. This tape gets sewn into your clothing or bags. The tape typically comes in different widths and colors to match your item.
Some zippers have a stop at the top to prevent the slider from coming off. Others have a pin and box at the bottom for jackets and coats.
Common Types of Zippers
Coil zippers use spiral-shaped plastic or nylon teeth. You’ll find these on lightweight items like backpacks and everyday clothing. They’re flexible and rarely break teeth.
Metal tooth zippers have individual metal teeth clamped onto the tape. Jeans and heavy jackets often use these because they’re strong and durable.
An invisible zipper sits behind the fabric seam so you can’t see the teeth from the outside. These work well for dresses and skirts where you want a smooth look.
A separating zipper comes completely apart at the bottom. You need this type for jackets, hoodies, and anything that opens fully in front.
How Zippers Work
The slider connects or separates the teeth as you move it. When you pull the slider up, its wedge shape forces the teeth together at a specific angle. The teeth lock into each other because of their shape.
Pulling the slider down does the opposite. The wedge pushes the teeth apart and they unlock from each other. This happens on both sides of the slider at the same time.
The teeth need to be aligned properly for this to work. If they’re bent or missing, the slider can’t join them correctly. That’s why your zipper gets stuck or comes apart when teeth are damaged.
Diagnosing Zipper Issues
Before you attempt to fix a zipper, you need to understand what went wrong and whether the damage can be repaired. The problem could range from a simple slider issue to broken teeth that require replacement.
Identifying Why the Zipper Came Off
The most common reason a zipper came off is that the slider detached from the teeth on one or both sides. This happens when the slider gets pulled too hard at an angle or when you force it past a snag. Sometimes the slider widens over time from repeated use, which makes it lose its grip on the teeth.
Check if the slider is still attached to one side of the zipper tape. If it is, you can usually guide it back onto the other side. If the slider came off completely, you need to thread both sides of the tape back through it.
Look at the bottom stop of your zipper. This small metal or plastic piece keeps the slider from coming off during normal use. A damaged or missing bottom stop often causes the slider to slide right off the end.
Assessing Damage to Zipper Teeth and Tape
Examine both sides of the zipper teeth carefully. Run your finger along the entire length to feel for missing, bent, or broken teeth. Even one damaged tooth can prevent the zipper from closing properly.
Check the fabric tape that holds the teeth. Look for tears, fraying, or separation from the teeth. The tape needs to be intact for the zipper to work correctly.
Common types of damage:
- Missing teeth near the slider
- Bent metal teeth that don’t align
- Cracked plastic teeth
- Frayed or torn zipper tape
- Broken top or bottom stops
Test the slider itself by gently squeezing it. If it feels loose or wobbles, it has likely widened and won’t grip the teeth properly.
When to Repair Versus Replace
You can repair a separated zipper if the teeth and tape are in good condition and only the slider came off. This fix takes just a few minutes and costs nothing if you have basic tools at hand.
Replace the zipper if you find multiple broken teeth, severely damaged tape, or a slider that won’t stay closed even after adjustment. A zipper with structural damage will fail again quickly.
Consider the item’s value when deciding. Replacing a zipper on an expensive jacket makes sense, but buying a new item might be better for a worn-out bag with multiple problems.
Repair if:
- Only the slider came off
- All teeth are intact
- The tape is not torn
- Just one or two teeth are slightly bent
Replace if:
- Multiple teeth are missing or broken
- The tape is torn or separating
- The item is old with other wear issues
Tools and Materials Required for Zipper Repair
You need a few basic tools and some specialized items to fix a zipper properly. The right zipper repair kit makes the job easier, and optional materials can help with specific problems.
Basic Tools for Zipper Repair
You only need a few simple tools that you probably already have at home. Needle-nose pliers help you remove old zipper sliders and attach new ones. Small scissors or thread snips let you cut threads cleanly without damaging fabric.
A seam ripper makes it easy to remove stitches when you need to replace an entire zipper. You’ll also want straight pins to hold the zipper in place while you work. A ruler or measuring tape helps you measure zipper length accurately.
Keep a small flathead screwdriver on hand to pry open zipper sliders if needed. Regular sewing needles and thread that matches your fabric color are necessary for hand-stitching repairs.
Selecting the Proper Zipper Repair Kit
A zipper repair kit contains replacement sliders in different sizes and styles. Most kits include metal and plastic sliders that fit standard zippers from size 3 to size 10.
Look for kits that have both separating and closed-bottom sliders. The kit should include top and bottom stops to secure the slider in place.
Good kits come with clear instructions that show you how to identify your zipper size. You can measure zipper teeth width or check the back of the old slider for a size number. Some kits include zipper lubricant or zipper wax to help the slider move smoothly after repair.
Optional Tools and Materials
An invisible zipper foot for your sewing machine makes it easier to install new zippers close to the teeth. This foot costs $5 to $15 and works with most standard machines.
Zipper wax or zipper lubricant fixes sticky zippers without replacing parts. You can also use a graphite pencil or white candle wax as alternatives. These products reduce friction and extend zipper life.
Fabric glue holds zipper tape in place temporarily before sewing. A lighter or matches can seal the cut ends of synthetic zipper tape to prevent fraying.
Step-by-Step Methods to Put a Zipper Back On
The zipper slider can come off the zipper teeth when the metal or plastic stops wear down or when you pull too hard. You need to remove the old stops, guide the slider back onto the zipper tape, and secure everything in place.
Removing Zipper Stops Safely
The zipper stops are small metal or plastic pieces at the top and bottom of your zipper that keep the slider from coming off. You need to remove the top stop to reattach your slider.
Use needle-nose pliers to grip the top stop gently. Pull the stop straight up and away from the zipper tape. Be careful not to tear the fabric or damage the zipper teeth below the stop.
If you have a metal stop, you can pry it open slightly before pulling it off. Plastic stops may need to be cut off with small scissors or wire cutters. Save the stop if it’s still in good condition because you’ll need to put it back on later.
Check the zipper teeth near where the stop was attached. Make sure none of them are bent or broken before you continue.
Methods to Reattach the Zipper Slider
Hold the zipper slider with the pull tab facing up. Look at the bottom of the slider where you’ll see two channels or grooves. These channels need to fit over the zipper teeth on both sides of the zipper tape.
Line up both sides of the zipper tape so the teeth face each other and interlock at the bottom. Insert both sides of the zipper tape into the bottom of the zipper slider at the same time.
Push the slider down toward the bottom of the zipper while holding the tape steady. You should feel the teeth start to connect as you gently pull the slider up. If the slider won’t move, take it off and try again.
Make sure the teeth align properly on both sides as you zip up. Once the slider moves smoothly, you can replace the top stop using pliers to crimp it back onto the zipper tape.
Using a Fork or Pliers for Reattachment
A regular dinner fork can help guide the zipper tape into the slider channels. Place both sides of the zipper tape between the middle tines of the fork. The fork holds the tape steady and aligned while you slide the zipper slider onto it.
Push the slider onto the zipper tape while it’s held by the fork. The fork keeps both sides of the tape at the right angle and distance apart. Once the slider is on and past the first few teeth, remove the fork and zip up slowly.
Needle-nose pliers give you better control when working with small zippers. Use the pliers to hold the zipper slider open slightly as you feed the zipper tape into the channels. You can also use pliers to gently squeeze the sides of the slider if it feels too loose on the teeth.
Don’t squeeze too hard or you’ll damage the slider. Test the zipper several times after reattachment to make sure it works smoothly along the entire length of the zipper tape.
Repairing Common Zipper Problems
Zippers can stop working properly due to several issues, including when they come off one side, have damaged teeth, or get stuck. Each problem requires a different repair method to get your zipper working again.
Fixing a Zipper That Has Come Off One Side
When your zipper comes off one side, you need to rethread the slider back onto the zipper tape. Start by examining the slider to see which side has come loose.
Pull the slider to the bottom of the zipper as far as it will go. Insert the side that’s still attached first, then carefully guide the loose side back into the slider channel. You may need to use pliers to gently widen the slider if the opening has become too tight.
Once both sides are inside the slider, hold the zipper tape taut with one hand. Use your other hand to pull the slider up slowly while keeping tension on both sides of the tape. The teeth should begin to mesh together as you move the slider upward.
If the slider keeps coming off, it may be too loose. Use pliers to gently squeeze the top and bottom of the slider to tighten it. Apply light pressure and test the zipper after each squeeze.
Resolving Misaligned or Damaged Teeth
Misaligned teeth prevent the zipper from closing properly and can cause a separated zipper. Look closely at the teeth along both sides of the zipper to find any that are bent, broken, or out of place.
For bent metal teeth, use needle-nose pliers to carefully straighten them. Grip the bent tooth gently and move it back into alignment with the other teeth. Work slowly to avoid breaking the tooth completely.
Plastic teeth are harder to repair because they break easily. If only one or two teeth are damaged near the top or bottom, you can create a new stopping point. Sew several stitches by hand across the teeth just below the damaged area to prevent the slider from moving past that point.
For severely damaged teeth in the middle of the zipper, replacement is usually the best option. Temporary fixes like rubbing a graphite pencil along the teeth can help the slider move past minor damage.
Dealing with a Stuck or Jammed Zipper
A stuck zipper often happens when fabric or thread gets caught in the slider. Stop pulling immediately if you feel resistance to avoid making the problem worse.
Gently pull the fabric away from the slider while moving the zipper pull slightly back and forth. If the fabric won’t release, use tweezers or a seam ripper to carefully remove caught threads. Cut only the trapped threads, not the zipper tape itself.
For zippers that move stiffly, apply a lubricant to help them glide smoothly. Rub a graphite pencil, bar of soap, or candle wax along both sides of the teeth. Move the slider up and down several times to distribute the lubricant evenly.
Rust or dirt can also cause a stuck zipper on outdoor gear or old items. Clean the teeth with an old toothbrush and soapy water, then dry thoroughly before applying lubricant.
Special Considerations for Different Zipper Types
Different zipper styles require specific techniques based on their design and placement. Invisible zippers need careful handling to maintain their hidden appearance, while separating zippers involve reattaching bottom stops correctly.
How to Repair Invisible Zippers
Invisible zippers sit behind the fabric seam and stay hidden when closed. They present unique challenges because the teeth curve under the fabric tape.
To reattach the slider, you need to access the zipper teeth from the wrong side of the garment. Open the seam at the top of the zipper by carefully removing a few stitches. This gives you room to work with the slider.
Key steps for invisible zipper repair:
- Unzip any visible portion first
- Remove stitches at the top of the zipper tape
- Slide the pull onto the teeth from the back side
- Use an invisible zipper foot if you need to re-sew the seam
The teeth should feed smoothly into the slider channels. Make sure the fabric tape faces the right direction before closing the slider. Once the slider is on, zip it up and down several times to test it.
Re-sew the seam using your original stitch line as a guide.
Restoring Separating Zippers
Separating zippers split completely at the bottom and appear on jackets and hoodies. The slider must go back on in a specific way to function properly.
Start by examining the bottom stop on the side without the insertion pin. This stop prevents the slider from coming off during normal use. You’ll need to position the slider above this stop.
Insert the pin side into the slider box first. Hold the slider at an angle and guide the pin through the bottom opening. Then feed the opposite tape into the other channel of the slider.
Steps for separating zipper repair:
- Align both tapes at the bottom
- Insert the pin into the slider box
- Feed the other tape into the slider channel
- Pull the slider up slowly while holding both sides
The teeth should begin to mesh together as you move the slider upward. Check that both sides align evenly.
Zipper Repair in Handbags, Jackets, and Other Items
Handbags often use small metal zippers that sit along curved edges. These tight spaces make repairs difficult. You may need to open the lining to access the top of the zipper tape.
Turn the bag inside out if possible. This gives you better access to the zipper mechanism. Small needle-nose pliers help guide the slider onto narrow zipper teeth.
Jackets typically use separating zippers made from heavy-duty materials. The slider needs more force to move along thick teeth. Make sure to support the fabric while working to avoid pulling the zipper tape from its stitching.
For sleeping bags and tents, check that dirt isn’t blocking the teeth before reattaching the slider. Clean the teeth with a soft brush first.
Luggage zippers face more stress than other types. Inspect the teeth for damage before putting the slider back on. Bent teeth will prevent the slider from moving smoothly and may require professional replacement.
Maintenance and Prevention Tips
Taking care of your zipper before problems occur saves time and money. Regular maintenance keeps zippers working smoothly for years.
Proper Use and Storage to Extend Zipper Life
Always zip and unzip your items slowly to prevent teeth from catching or separating. Pull the slider straight along the track instead of at an angle. This reduces stress on the zipper teeth and slider mechanism.
When you store items with zippers, keep them fully closed. An open zipper can bend or warp over time. Store clothing and bags in a cool, dry place away from direct sunlight.
Avoid overstuffing bags or forcing zippers closed over bulging fabric. This puts too much pressure on the teeth and can cause them to pop open or break. If your zipper won’t close easily, remove some contents first.
Keep the zipper area clean and free from debris. Small particles like sand, dirt, or food crumbs can jam the slider or damage the teeth.
Cleaning and Lubricating the Zipper
Clean your zippers every few months or when they feel sticky. Use a soft toothbrush to remove dirt and lint from between the teeth. Wipe the area with a damp cloth and let it dry completely.
Apply zipper lubricant or zipper wax to keep the mechanism moving smoothly. You can also use graphite from a pencil, bar soap, or candle wax as alternatives. Run the lubricant along both sides of the teeth.
Move the slider up and down several times to spread the lubricant evenly. Wipe away any excess with a clean cloth. For metal zippers, a small amount of petroleum jelly works well but may stain fabric.
Never use cooking oil or similar products as they attract dirt and can make the problem worse.
When and How to Replace Zippers
Replace zipper when teeth are missing, cracked, or severely bent. A damaged slider that won’t stay closed after adjusting also needs replacement. If the fabric tape holding the teeth is torn or fraying badly, you should install a new zipper.
You can replace zippers yourself with basic sewing skills. Remove the old zipper by cutting the stitches with a seam ripper. Pin the new zipper in place and sew it using a zipper foot attachment on your sewing machine.
For valuable items or difficult repairs, take them to a tailor or seamstress. They have the tools and experience to replace zipper parts quickly. Professional replacement typically costs between $10 and $30 depending on the item.
Frequently Asked Questions
Zipper repairs often require specific techniques depending on the problem. Most issues can be fixed with basic household tools like pliers, scissors, and replacement parts from a sewing kit.
What is the correct method to reattach a slider to a zipper?
You need to remove the top stop on one side of the zipper using pliers. Slide the zipper pull onto both sides of the zipper tape at the same time. Make sure the pull faces the right direction with the tab pointing up.
Push the slider down toward the bottom of the zipper. Use pliers to crimp the top stop back in place or sew a few stitches across the top to create a new stop.
Can a zipper be fixed if the teeth have come off the track?
You can fix a zipper when the teeth separate from the track. Start by moving the slider to the bottom of the zipper. Line up the teeth on both sides so they face each other properly.
Insert both sides of the zipper tape into the slider at the same angle. Pull the slider up slowly while holding the fabric taut. The teeth should connect as the slider moves up the track.
What tools are required to repair a zipper that has come off its tracks?
You need needle-nose pliers for most zipper repairs. Small scissors help cut thread or trim excess material. A seam ripper works well for removing old stops or stitches.
Some repairs require replacement zipper stops from a sewing kit. You might also need a small screwdriver to pry open the slider if it’s too tight.
Is it possible to replace a zipper pull that has broken off?
You can replace a broken zipper pull without changing the entire zipper. Remove the top stop with pliers and slide off the old slider. Purchase a replacement slider that matches your zipper type and size.
Slide the new pull onto the zipper teeth from the top. Replace the stop or sew across the top to secure it. You can also attach a paper clip or key ring to a slider that’s missing just its tab.
How do you realign a zipper that won’t close properly?
Move the slider to the bottom of the zipper to start the realignment. Check if any teeth are bent or damaged along the track. Use pliers to gently straighten any bent teeth.
Insert both sides of the zipper into the slider evenly. Pull the slider up while keeping equal tension on both sides of the fabric. If the slider is worn out and too loose, you can squeeze it gently with pliers to make it grip better.
What are the steps to replace a zipper stop that has fallen off?
You need to create a new stop at the top or bottom of the zipper. For a top stop, use pliers to attach a metal stop from a repair kit. Crimp it firmly onto the zipper tape where the old one was located.
If you don’t have a replacement stop, sew several tight stitches across the zipper tape. Make a bar tack by stitching back and forth 5-6 times. This creates a barrier that prevents the slider from coming off the track.

- How To Reattach A Zipper? - February 20, 2026
- How to Put a Zipper Back On? A Step-by-Step Repair Guide - February 19, 2026
- How To Fix A Broken Zipper? Simple Repair Methods for Every Type of Damage - February 19, 2026