Metal zippers add a touch of durability and a classic look to any project, from jeans to bags. Learning how to sew a metal zipper might seem daunting, but with the right techniques and a little patience, you can achieve professional-looking results. This guide will walk you through the process, ensuring a smooth and successful zipper installation.
Table of Contents
ToggleWhy Choose a Metal Zipper?
Metal zippers are known for their strength and longevity. They’re a great choice for items that will experience heavy use or require a more robust closure. Unlike plastic zippers, metal zippers can withstand more wear and tear.
Essential Tools and Materials
Before you begin, gather these essential items:
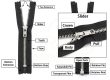
- Metal Zipper (of the appropriate length)
- Fabric pieces
- Sewing machine with a zipper foot
- Thread that matches your fabric
- Pins or fabric clips
- Scissors (preferably old ones for trimming the zipper)
- Seam ripper (just in case!)
- Hand sewing needle (for adding a new zipper stop, if needed)
Step-by-Step Guide to Sewing a Metal Zipper
1. Preparing Your Fabric and Zipper
- Cut Fabric: Cut your fabric pieces at least 1 inch longer than the length of your metal zipper. This extra length allows for easier handling and ensures a clean finish.
- Zipper Length Adjustment (If Necessary): If your metal zipper is too long, determine where you want the zipper to end. Using old scissors, carefully cut between the metal teeth at your marked point. Important: Metal teeth are sharp and can damage your scissors.
- Create a New Zipper Stop: To prevent the zipper pull from coming off, add a new zipper stop. Using a hand-sewing needle and thread, stitch across the zipper tape just above the cut area. This reinforces the end and secures the zipper.
2. Optional: Attaching Zipper Tabs
- Create Zipper Tabs: For a neat finish, consider creating zipper tabs. Cut small fabric pieces (approximately 1 inch by 2 inches).
- Fold and Sew: Fold the fabric pieces over the trimmed ends of the zipper, creating tabs. Sew these tabs in place using your zipper foot. This adds a finished look and prevents the zipper pull from slipping off.
3. Positioning the Zipper
- Align and Pin/Clip: Place the zipper right sides together with the fabric edge where you want the zipper to be. Pin or clip the zipper tape to the fabric, ensuring the metal stop is at least 1/2 inch from the fabric edges. This allows clearance for your sewing machine needle.
4. Sewing the Zipper
- Attach the Zipper Foot: Attach your zipper foot to your sewing machine. This foot allows you to sew close to the zipper teeth.
- Sewing: Begin sewing, keeping the needle as close to the zipper teeth as possible without hitting them. As you approach the metal teeth or stops, slowly turn the hand wheel to control the needle placement. This prevents your needle from breaking. Ensure the needle lands between the teeth, not on them.
5. (Optional but Recommended) Topstitching
- Turn Right Sides Out: Once both fabric layers are attached to the zipper, turn the project right sides out.
- Topstitch: Topstitch along the seam, close to the zipper. This creates a professional finish and helps to secure the zipper in place. Again, use the hand wheel when near the metal stops or teeth to avoid damaging your needle.
6. Checking and Finishing
- Test the Zipper: Open and close the zipper several times to ensure it moves smoothly and that all stitching is secure.
- Trim Threads: Trim any loose threads for a clean and polished look.
Tips for Success
- Go Slow: Sewing metal zippers requires patience. Take your time, especially when maneuvering around the metal teeth and stops.
- Use the Hand Wheel: Always use the hand wheel to guide the needle when sewing over the ends of the zipper or near the metal teeth.
- Choose the Right Needle: Use a needle appropriate for the weight of your fabric.
- Practice: If you’re new to sewing metal zippers, practice on scrap fabric first.
Troubleshooting Common Issues
- Needle Breaking: This is often caused by sewing over the metal teeth. Always use the hand wheel and ensure the needle is positioned correctly.
- Zipper Not Closing Smoothly: Check for any snags or obstructions in the zipper teeth. You may need to adjust the tension on your sewing machine.
- Zipper Pull Coming Off: Ensure your zipper stop is securely in place. If necessary, reinforce it with additional stitching.
Conclusion
Learning how to sew a metal zipper is a valuable skill that can elevate your sewing projects. By following these steps and tips, you can confidently install metal zippers and achieve professional results. Remember to take your time, be patient, and enjoy the process. Now go ahead and add that touch of metal to your next creation!

- How To Reattach A Zipper? - February 20, 2026
- How to Put a Zipper Back On? A Step-by-Step Repair Guide - February 19, 2026
- How To Fix A Broken Zipper? Simple Repair Methods for Every Type of Damage - February 19, 2026